Redaction removes selected content from a document so you can release a version with sensitive information concealed. In Nobly Insight, you first mark the content, then apply the redactions, review the result, and save a new revision. This walkthrough uses a fictional service agreement. You will remove a contact name and email address on two pages, a payment reference, and a signature. Screenshots show the local document viewer with fictional sample data and English labels. Select a screenshot to enlarge it. To ask AI to identify sensitive text, follow Use AI-assisted redaction, then complete the same review, apply, save, and release checks.

Before you begin

  • You need access to the document and the redaction feature, plus permission to view and create document revisions. The document type must allow revisions. These requirements also apply when you only want to save annotations or reviewable marks.
  • Open a supported rendition: a PDF, an Office document (.doc, .docx, .xls, .xlsx, .ppt, or .pptx), an image, or an .eml or .msg email. Conversion may be needed before you can work on it. Other Office variants, such as macro-enabled files or templates, may support Office editing without being supported for redaction.
  • Decide what should be removed and what the recipient still needs to read. Check whether the release also includes attachments, related documents, or metadata.
If the viewer is unavailable, ask the person managing your access to check document access rights and feature availability.
A coloured mark, highlight, or rectangle does not by itself remove content. Save without Apply preserves reviewable marks. Apply every intended redaction before producing a release copy. Earlier revisions and original files remain accessible to people with the relevant rights.

Open and prepare the document

1

Open the redaction viewer

Find the document, select it, and choose Open in redaction from the document actions. Hover over the pen icon to see its label. In Caseflow, the same viewer may appear inside a document panel.Check the document name and Revision selector. The redaction viewer initially opens the latest revision; check it again even if you were viewing an older revision elsewhere.
2

Convert the file if prompted

Choose Continue in Convert to PDF to prepare a supported Office document, image, or email for the viewer. Inspect the converted pages before marking them: page breaks and layout can differ from the source application.Image conversion includes OCR, which recognises text so it can be selected and searched. An email conversion includes the message but excludes attachments. Open and review each attachment separately if it is part of the release. Saving your work creates a PDF revision; it does not edit the original Office or email file in place.
3

Check that text can be selected and searched
Try selecting a known word or using Search document in the right sidebar. If a PDF is not searchable, the viewer offers Run OCR on document. You can also choose Run OCR in the top bar and confirm Continue.Wait for OCR to finish, then check a known phrase again. OCR can miss handwriting, faint text, or unusual layouts. Use area marks for content you can see but cannot reliably select. Run OCR before applying redactions; if you already applied them, use Undo apply first.
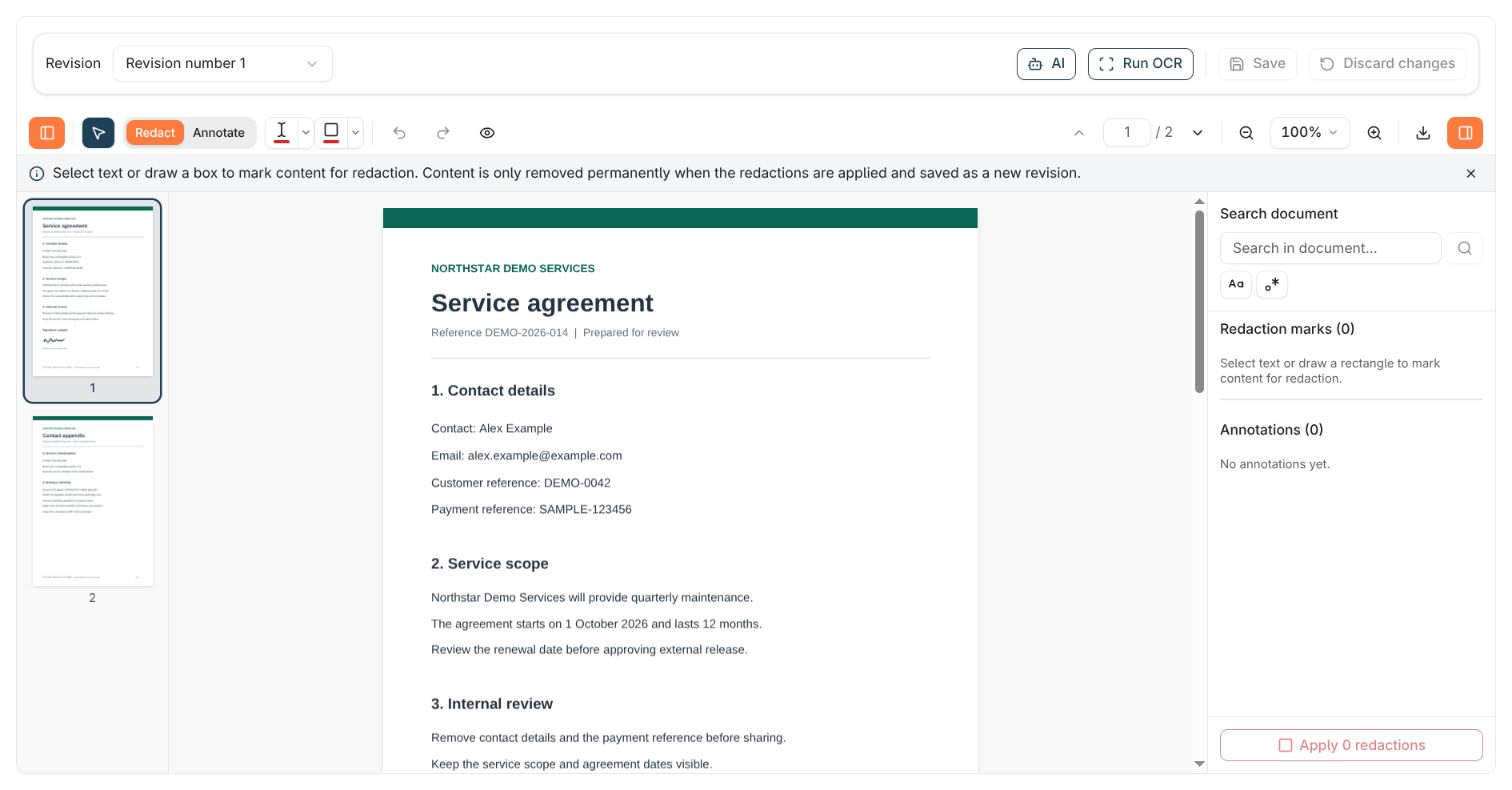
The fictional service agreement open at revision 1, with Redact and Annotate tabs, page navigation, zoom, document search, and an empty redaction list.

The redaction viewer: revision and save controls at the top, drawing tools below, page thumbnails on the left, and document search and marks on the right.

Use the thumbnail rail, Previous page, Next page, or Go to page to move through the document. The Zoom menu offers percentages, Fit to width, and Fit page. On a narrow panel, use Toggle thumbnails and Toggle sidebar to open the panels you need. See viewing and document actions for revisions, metadata, and other tools.

Mark text manually

  1. Choose Select, then drag across the exact text you want to remove. In the example, select Alex Example without the Contact: label.
  2. Choose Mark for redaction from the selection popup. Alternatively, choose Redact → Redact text first; dragging across text then creates a mark directly.
  3. Check the coloured overlay and the new entry in Redaction marks. Zoom in if necessary and check that the first and last characters are covered.
  4. If the selection is wrong, use Undo or Delete mark, then select it again.
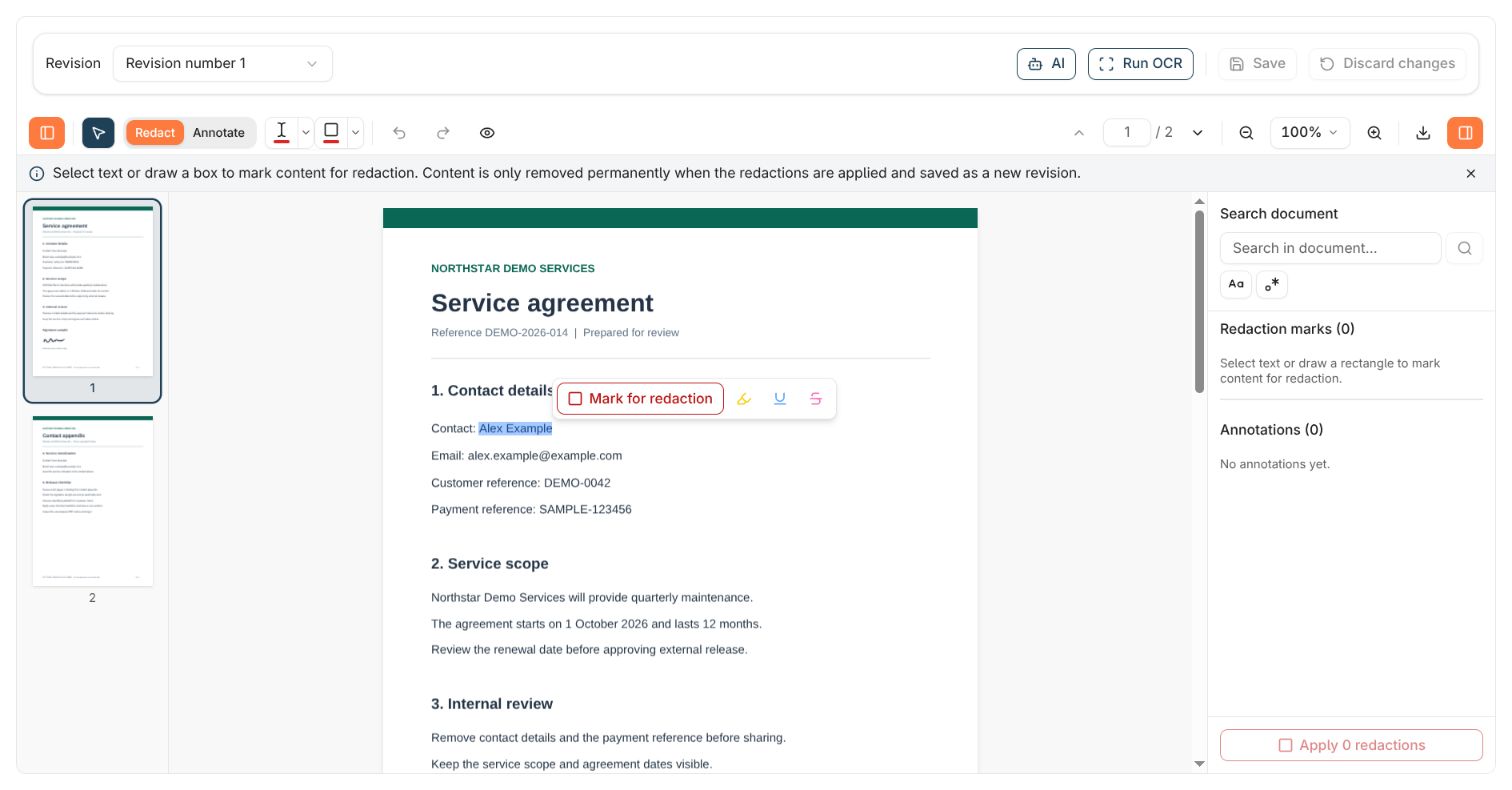
Alex Example selected in the document, with the Mark for redaction, Highlight, Underline, and Strikeout actions visible.

Select text and choose Mark for redaction. The other popup actions add annotations without removing the underlying text.

Catch repeated details

After you mark text, the viewer can report that it appears elsewhere. Choose Mark all in that message to mark the remaining matches. Review those locations: the same name or number may appear in a header, footer, or appendix.
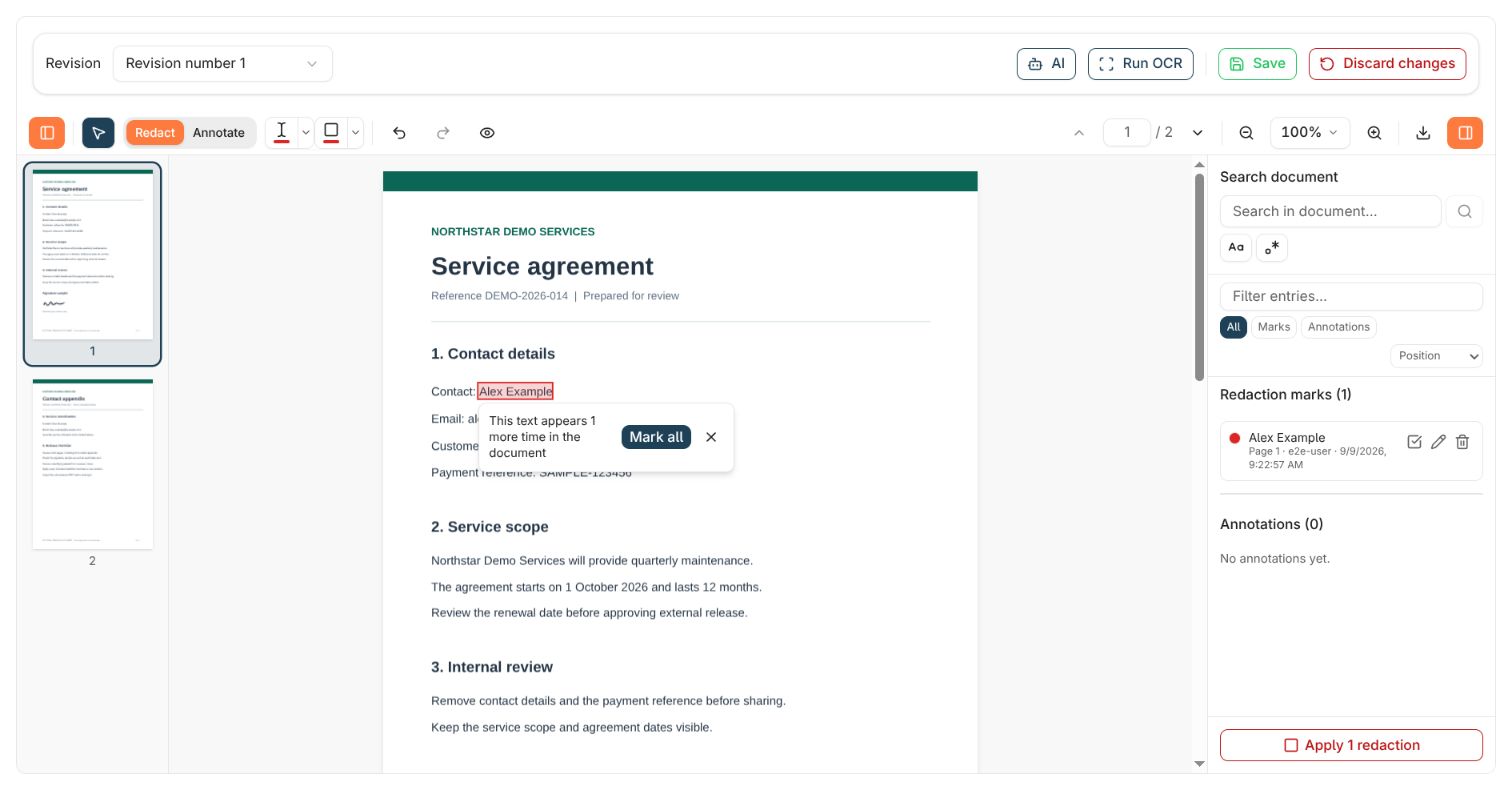
One pending mark for Alex Example and a message saying the text appears one more time, with a Mark all button.

The sample name occurs again on page 2. Mark all adds the remaining occurrence to the review list.

This finds matching text, not every way the same person or detail might be written. Search separately for initials, alternative spellings, and differently formatted identifiers. A successful apply does not prove you found everything that needs to be removed.

Find and mark text across pages

  1. Open the right sidebar with Toggle sidebar if needed.
  2. Under Search document, enter the exact text, such as alex.example@example.com, and press Enter or choose Search.
  3. Review the match count and select a result to jump to its page.
  4. Choose Mark for redaction beside an individual result, or Mark all for redaction to mark all listed matches.
  5. Check the resulting Redaction marks. After all results are marked, the search box and result list clear. The marks remain.
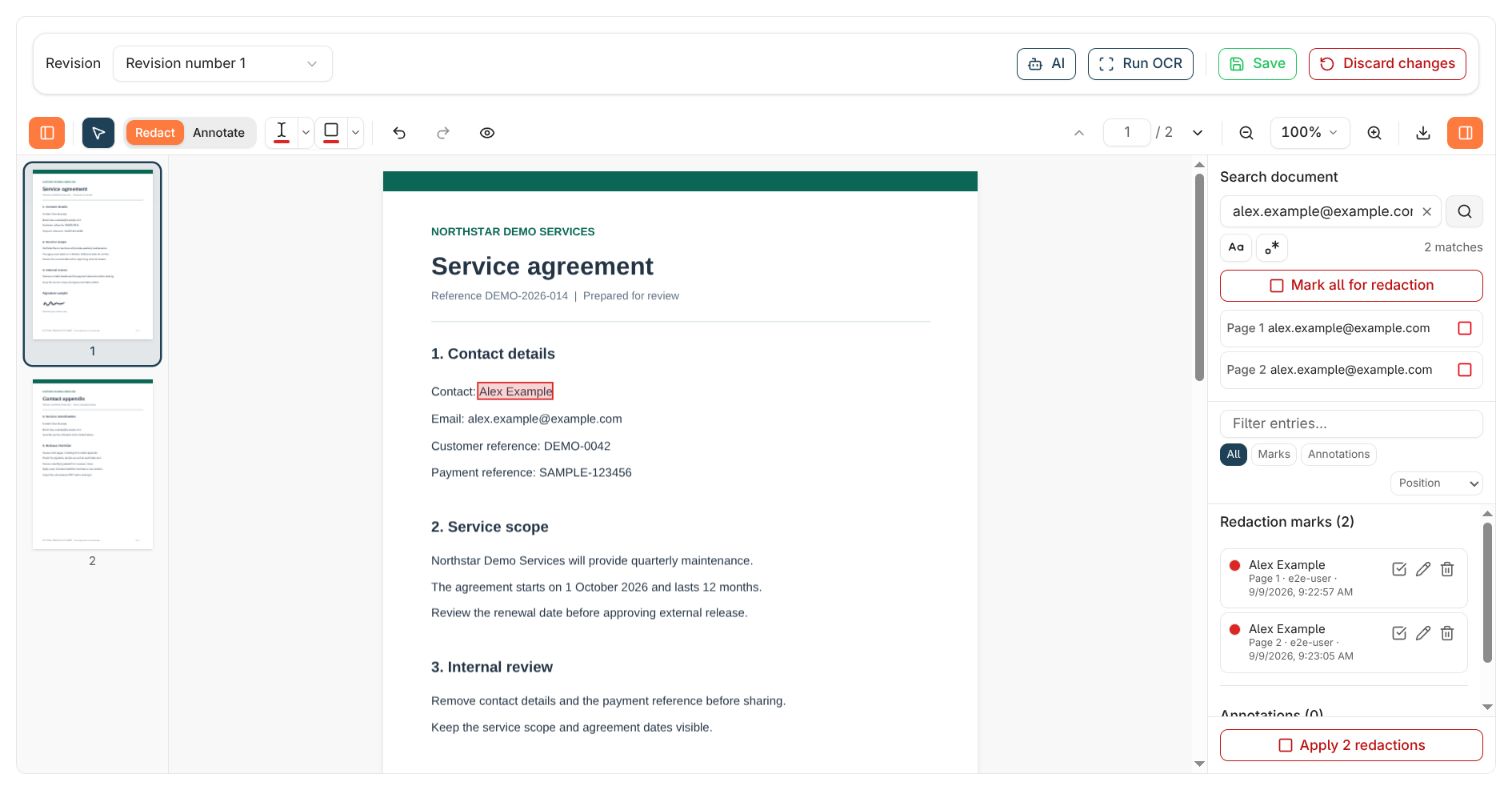
A search for alex.example@example.com returns two matches, on pages 1 and 2, with a Mark all for redaction action.

Document search finds the email address on both pages. You can mark individual results or all matches.

Match case restricts results by capitalisation. Regular expression lets you search a pattern instead of literal text. For example, with regular expressions enabled, SAMPLE-[0-9]{6} matches the example payment reference SAMPLE-123456. Check every result before marking a pattern’s matches; it can match unrelated values and miss different formatting. Turn the mode off before returning to a literal search. Search document searches the PDF’s recognised text. Filter entries… only filters the marks and annotations already in your review list; it does not search for unmarked content.

Mark a signature, image, or area

  1. Choose Redact → Redact area.
  2. Zoom in and drag a rectangle around the whole region to remove. For the example signature, include all pen strokes and a small margin.
  3. Release the pointer and inspect the overlay. An area mark appears as Rectangle — Page … in the sidebar.
  4. If it misses part of the content or covers too much, delete the mark and draw a new one.
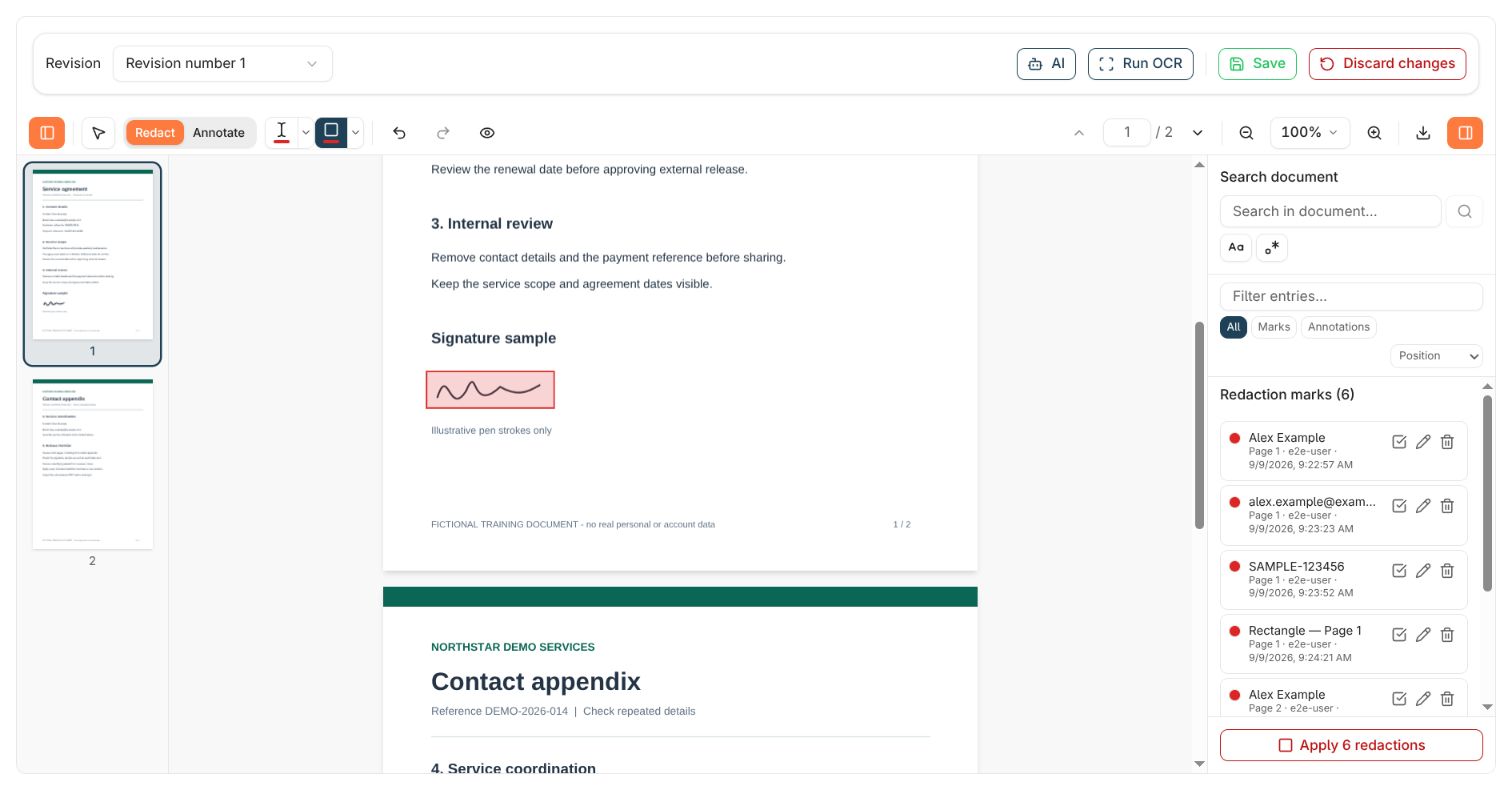
Redact area selected, with a red rectangular mark covering the fictional signature and six pending redactions listed.

An area mark covers the signature graphic, which is not selectable text.

Use this approach for scanned text, handwriting, photographs, barcodes, or other visible regions. Check these areas visually even when text search returns no matches. Annotate area, on the Annotate tab, adds markup and does not redact the region. The colour control beside a redaction tool changes the tint of its review marks. Applied redactions use black fill; choosing another review colour does not change the final fill.

Use AI-assisted redaction

AI redaction helps you identify sensitive text in the open document and adds suggested redaction marks for you to review. You can also ask questions about the document. You decide which marks to keep and when to apply and save them. Before starting, check that AI redaction is available to your account, that the correct Revision is open, and that known text can be found with Search document. Run OCR first when needed. AI text suggestions depend on recognised text; signatures, images, and unreadable scans still need visual review.

Ask AI to mark sensitive text

1

Open AI redaction

Choose AI in the top bar. The AI redaction chat opens over the viewer. You can drag its header or resize the window if it obscures the document.
2

Describe what to remove and what to keep

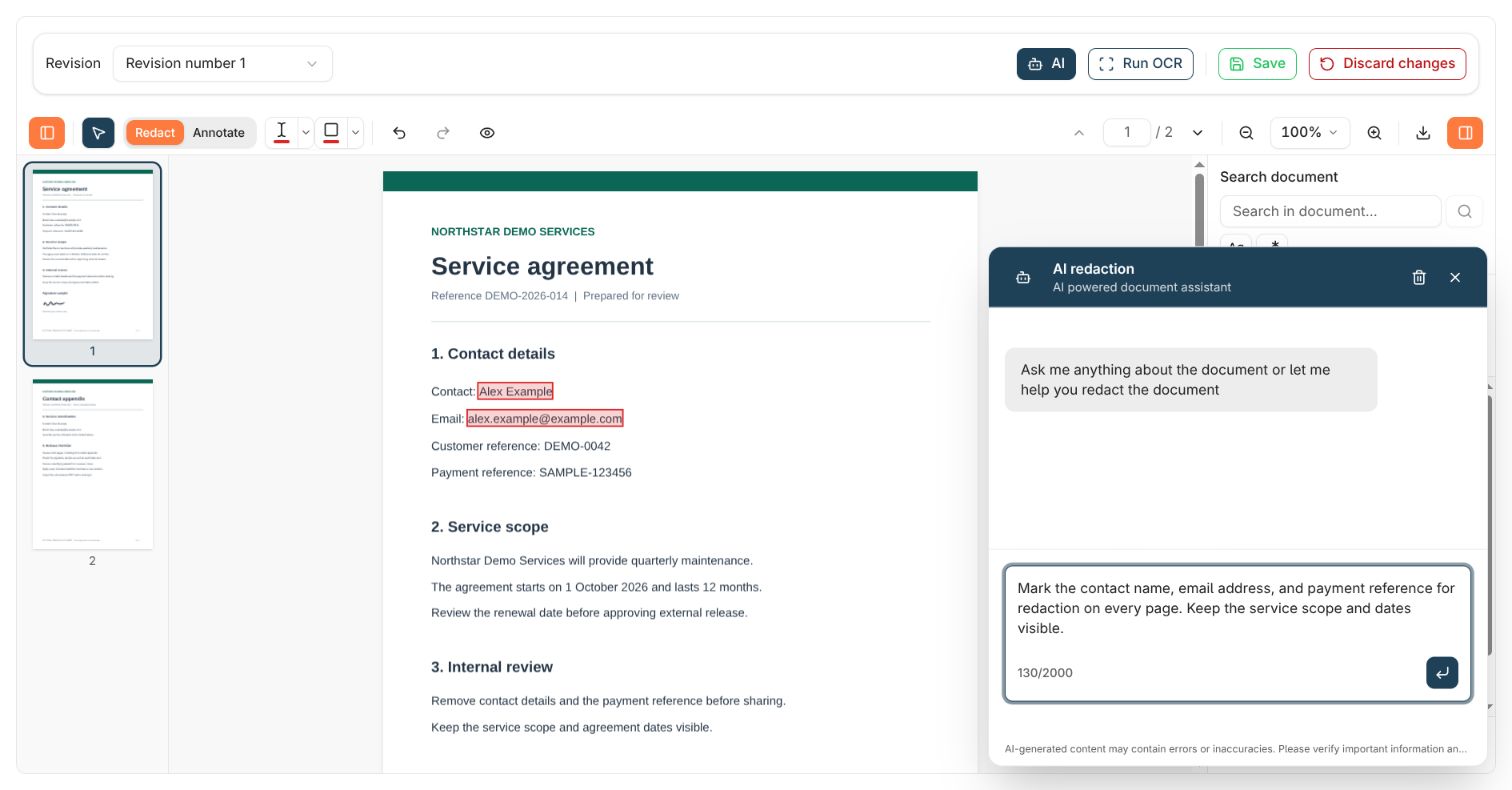
In Type your question here…, name the categories or exact values you want marked. State which useful information should remain visible.For the fictional agreement, enter:
Mark the contact name, email address, and payment reference for redaction on every page. Keep the service scope and dates visible.
Use a focused request that you can check against the document. A broad request such as “remove everything sensitive” leaves the selection criteria unclear.
3

Submit and wait for the marks

Choose the arrow button (Submit) or press Enter. Use Shift+Enter for a new line in your prompt. Wait for the response before applying, saving, exporting, or changing revisions.When the response includes text to redact, the viewer finds matching occurrences across the document and adds them to Redaction marks. A response may only answer your question and add no marks. Confirm the proposed redactions in the document and the list.
4

Review the suggestions on the page

Close the chat with Close if it covers the sidebar. Select each mark to jump to its page and inspect the covered text. Closing the chat leaves the marks in place.For this example, check the name and email on both pages and the payment reference on page 1: five intended text locations. Check that the service scope and dates remain unmarked. This is your review target for the sample, not a guaranteed AI result.
AI redaction chat with an example prompt asking to mark the contact name, email address, and payment reference on every page while retaining scope and dates.

An example request ready to send in AI redaction. The visible marks were added manually earlier in the walkthrough.

Write and refine your request

Adapt these example prompts to the document and your release requirements: A follow-up request can add marks to the existing list. If you change your mind about earlier suggestions, use Delete mark on the entries you want to remove. Clear chat clears the displayed messages; it does not remove document marks or undo an applied result.
Suggested text is matched across all pages. Asking AI to redact a value “only on page 1” does not restrict where matching marks are added. Review every occurrence and remove unwanted marks before applying, or use manual selection when you need precise control over individual locations.

Correct and complete the AI suggestions

  1. Remove incorrect marks. Check that names, dates, or numbers you intend to keep have not been marked. Delete incorrect entries you can edit. For an applied, unsaved result, use Undo apply before correcting it.
  2. Add missed text. Use Search document for known values and alternative spellings, or select the text manually. In the sample, search for both the name and email and inspect both pages even if the reply says they were marked.
  3. Cover non-text content. Use Redact → Redact area for the signature sample. AI text suggestions do not replace checking handwriting, photographs, barcodes, or other visible regions.
  4. Review the complete list. Clear sidebar filters and check all pending marks, including any you added manually before using AI. The bulk apply action includes those marks too.
  5. Finish the redaction. Follow Apply, inspect, and save, then download and check the release copy. AI suggestions do not apply redactions or save a revision for you.

If AI does not add the expected marks

AI suggestions can miss sensitive information or select text you need to retain. A chat response alone does not mean the file has been redacted or saved. See AI data and privacy for how document content is handled.

Review the marks

Select a sidebar entry to jump to its page and select the mark. Use Edit note to explain why it is marked, and Delete mark to remove an incorrect mark you can edit. Avoid copying the sensitive value into your note; write “Remove contact details” instead. You can narrow the list to Marks, filter entries by text, and use author or colour filters when they are available. Sort entries offers Position, Newest first, Author, and Type. Clear filters for your final review.
Sidebar filters only change the list you see. They do not limit the bulk Apply … redactions action. Check its count before applying. Use Apply this redaction mark beside one entry when you intend to apply only that mark.

Save marks for another reviewer

To hand off a reviewable version, choose Save before applying the marks. Add a revision comment if prompted, for example “Marked for review; redactions not yet applied.” A new revision stores the pending marks and annotations while retaining the underlying content. The next reviewer needs access to the document and the revision rights described above. They open that revision, inspect the marks, and apply the intended redactions. Saving marks for review is not a release copy. The current viewer normally lets you edit or delete your own entries and entries without an author; another author’s entry may be read-only.

Apply, inspect, and save

1

Apply the reviewed marks

Choose Apply … redactions at the bottom of the sidebar to apply all pending marks, or Apply this redaction mark beside one entry.Wait for processing to finish. The viewer displays the redacted working result. Applying does not create a stored revision yet.
2

Inspect the result on every page

Check the blacked-out regions and the content around them. Confirm that useful information remains readable and that all intended regions have been removed. In the example, check both pages’ contact details and the signature on page 1.To revise an applied result before saving, choose Undo apply. Your marks and annotations remain available for adjustment. Add any missing marks and apply again. Marks added after an apply stay pending until you apply them too.
3

Save a new revision

Choose Save in the top bar. If Revision comment opens, describe the change and choose Save in that dialog. Some document types require a comment.Wait for the success message and check that the Revision number advances. Reopen the saved revision and inspect it before sharing. Saving an applied result preserves that result; any marks you left pending remain reviewable marks rather than becoming additional permanent redactions.
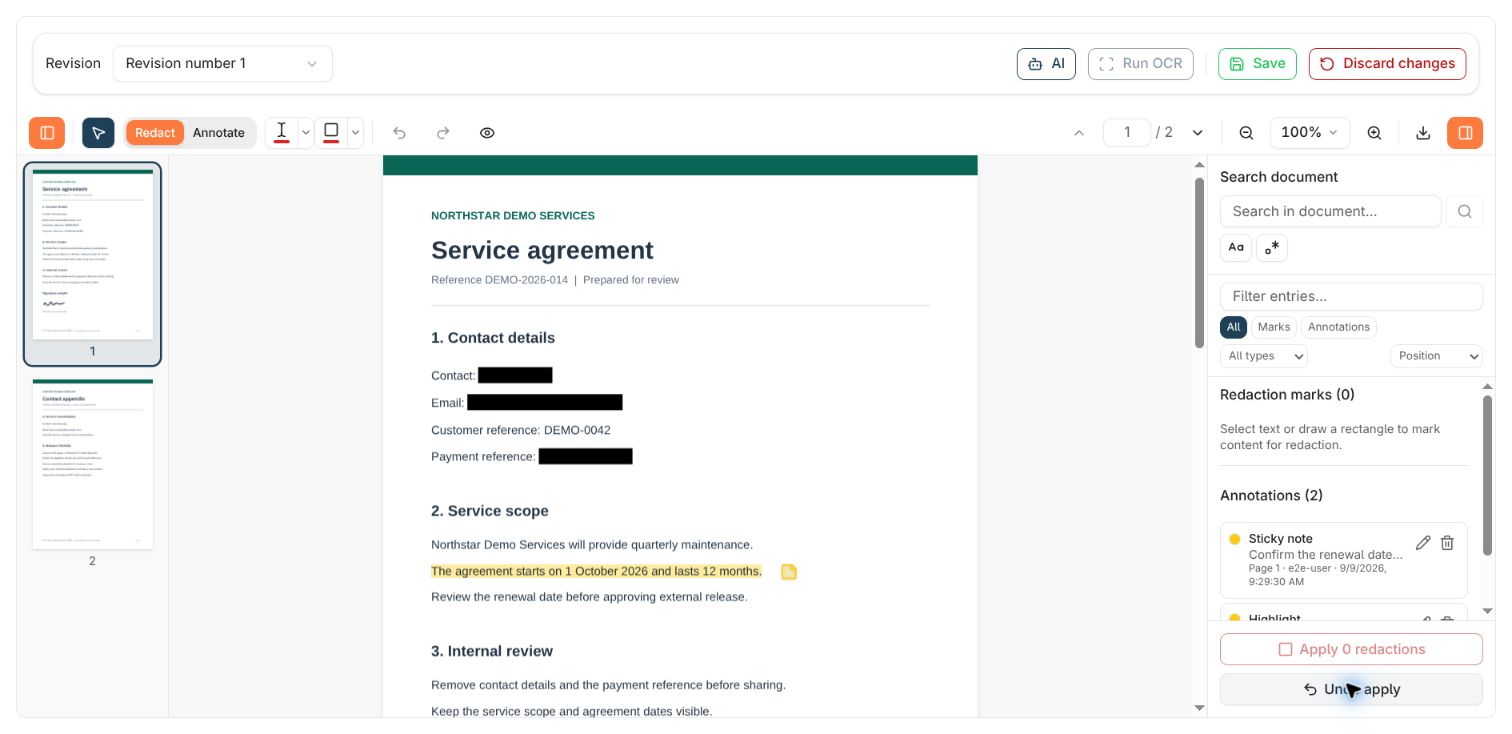
The sample document after applying redactions, with black regions over the name, email, and payment reference and Undo apply visible in the sidebar.

After applying, the marked text is replaced by black regions. Undo apply remains available while this result is unsaved.
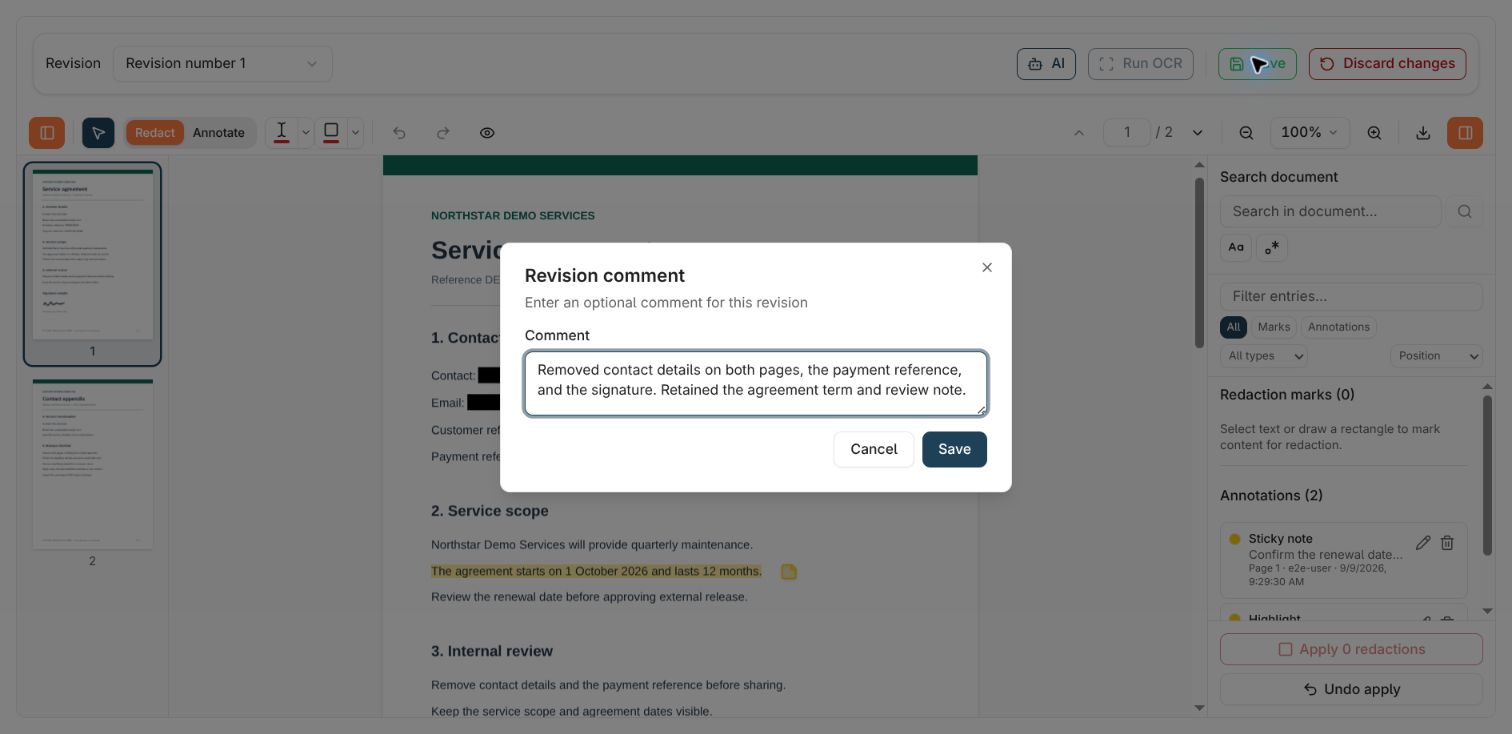
The Revision comment dialog with a description of removing contact details, the payment reference, and the signature from the two-page example.

A revision comment records what changed when you save the redacted result.

Understand the different ways to undo or leave

If another user saves a revision, the viewer may ask whether to load it. Finish or save your current work before accepting when you need to preserve an applied result. Undo apply cannot remove redactions already saved into the current revision’s content; an accessible earlier revision is a separate version.

Download and check a release copy

Use Download in the redaction viewer to export the current working result as a PDF:
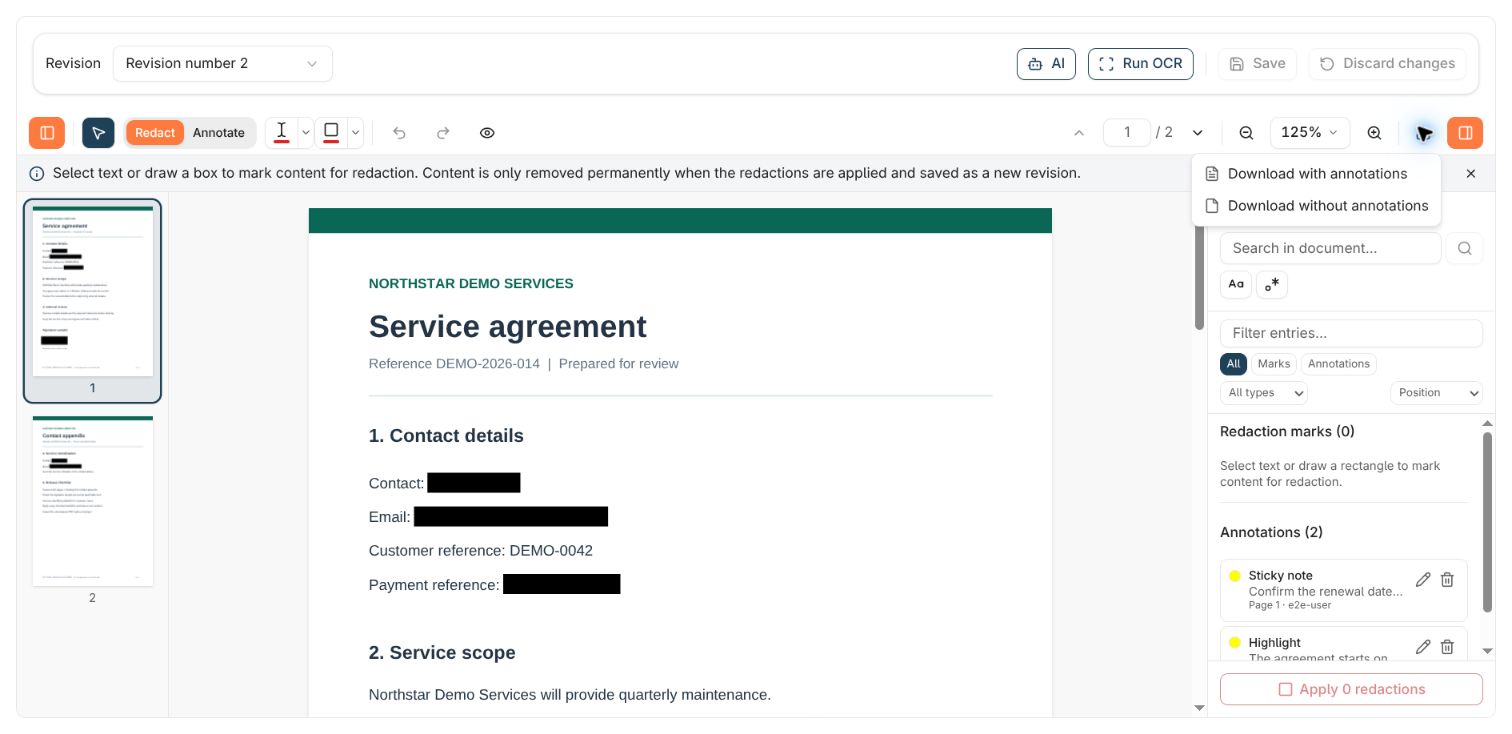
The Download menu offering Download with annotations and Download without annotations above the redacted sample document.

Choose whether the exported PDF includes review annotations. Neither download option applies pending redaction marks for you.

Downloading does not save a revision. You can export an applied working result before saving, but save first when you also need that result retained in Nobly Insight. The separate Download document action elsewhere retrieves a stored rendition; it does not include unsaved edits from this viewer. Before releasing the file:
  1. Open the actual downloaded PDF and review every page, including appendices.
  2. Search for the removed names, addresses, and identifiers. Try selecting and copying text around the redacted areas. A search with no matches is useful evidence, but does not check images or missed OCR text.
  3. Inspect the signature, images, and area marks visually. Check that the document is still understandable.
  4. Inspect any included annotations and comments. Check the filename, document properties, links, form fields, and any separately shared keywords or notes for details you also need to remove. Download without annotations removes markup; these other surfaces still need review.
  5. Check attachments and related files separately. Share the verified file through your organisation’s approved process.
A Copy link action does not create a redacted-only copy or change the recipient’s access. A recipient with access to earlier revisions may still see the original content. Use the verified PDF when the intended deliverable is a fixed redacted file.

Troubleshooting

How to annotate a document

Add highlights, drawings, notes, and callouts, and save a reviewable revision.

Viewing and document actions

Navigate documents and revisions, inspect metadata, and choose the right download or editing action.