> ## Documentation Index
> Fetch the complete documentation index at: https://docs.insight.nobly.dk/llms.txt
> Use this file to discover all available pages before exploring further.
# Configure a Microsoft 365 mailbox
> Grant access, connect a Microsoft 365 mailbox, save its application secret, and enable scheduled mail imports in Nobly Insight.
The mailbox importer reads a Microsoft 365 user or shared mailbox through Microsoft Graph. You choose how messages become documents, map mail metadata to keywords, and start postprocessing through **Mail imported** workflow triggers.
Each configuration watches **one folder**. You can configure several mailboxes or folders. Importing leaves the source message unchanged: it does not move, delete, or mark the message as read.
## Before you begin
* Confirm mailbox import is provisioned for your tenant and that the Client, API, and Workflow Engine versions support it. If **Mailbox importer** or **Mail imported** is missing, check availability and permissions first.
* Have the Microsoft 365 tenant ID, application ID, intended mailbox address, and folder ready. The application needs permission to read the message body and attachments without a signed-in user.
* Prepare the destination [document types](/configuration/document-types) and [standalone keyword types](/configuration/keyword-types). Record the document type IDs and confirm the keyword names to select for each destination. The mapping dropdowns show keyword names with IDs.
* Confirm the importer service account has **Document Creation** and the required keyword rights on **every** destination type, including attachments and rule-specific destinations. This account is established for your tenant; you do not choose it in the mailbox form.
* Use a dedicated test mailbox or folder for your first import. Decide the earliest received time to include before saving the configuration.
## Grant access in Nobly Insight
Open **Admin settings → Access → Permissions** and grant the appropriate tier to your user groups. You need **Manage permissions** to change grants; see [Managing permissions](/permissions/managing-permissions).
| Permission | What you can do |
| ------------------------- | ------------------------------------------------------------------------------------------------------------ |
| `mailbox-importer.view` | Read mailbox settings, keyword type names, credential presence, polling status, and import history |
| `mailbox-importer.manage` | Everything in View, plus create and edit configurations, enable or disable imports, and retry failed imports |
| `mailbox-importer.admin` | Everything in Manage, plus enter and rotate the application secret |
For example, give an **Import monitoring** group View, an **Import configuration** group Manage, and a **Mailbox credentials** group Admin. These are example group names you can adapt.
The secret remains write-only even with Admin. All three tiers can see the keyword type catalogue used by the mapping dropdowns; separate document keyword access is not required to see these names. Importer permissions do not grant access to archived documents or their keyword values. The service account's document rights and each reader's document rights are separate from these settings permissions.
## Prepare the Microsoft 365 application
You need access to register applications and arrange the required Microsoft 365 permission grants. If someone else manages your Microsoft 365 tenant, give them the mailbox list and the access requirements below.
### Register the application
1. In the **Microsoft Entra admin center**, open **Entra ID → App registrations → New registration**.
2. Give the application a recognizable name, such as **Nobly Insight mailbox import**. For a customer-specific registration, choose accounts in that organizational directory only. The importer does not need a redirect URI or interactive sign-in.
3. After registration, copy **Directory (tenant) ID** and **Application (client) ID** from **Overview**. These go into the correspondingly named fields in Nobly Insight. They are not the application's object ID.
Microsoft maintains the [application registration procedure](https://learn.microsoft.com/en-us/entra/identity-platform/quickstart-register-app).
### Grant mail access and restrict the mailboxes
The required capability is application-only **Mail.Read**. Basic mail permissions omit content needed for archiving. The importer does not need mail write or send access.
Choose the access model with the person responsible for Exchange Online:
| Access model | Configuration |
| ----------------------------------------------------------- | -------------------------------------------------------------------------------------------------------------------------------------------------------------------------------------------------------------------------------------------------------------------------------------------------------------------------------------------------------------------------------------------------- |
| **Exchange Online RBAC for Applications** | Assign **Application Mail.Read** to the application's service principal with a resource scope containing only the intended mailboxes. Follow Microsoft's [Application RBAC setup and authorization checks](https://learn.microsoft.com/en-us/exchange/permissions-exo/application-rbac). |
| **Existing Entra permission and Application Access Policy** | Under the app's **API permissions → Add a permission → Microsoft Graph → Application permissions**, select **Mail.Read** and grant tenant admin consent. An Exchange Application Access Policy must restrict that grant to the intended mailboxes. Microsoft labels this the [legacy access-policy model](https://learn.microsoft.com/en-us/exchange/permissions-exo/application-access-policies). |
An RBAC scope does not narrow an independent, organization-wide Entra **Mail.Read** grant. Review both sources of access; otherwise the app can still read other mailboxes. Microsoft's RBAC test checks RBAC assignments only. Verify an allowed mailbox and an excluded mailbox through Graph after access changes have propagated. See the [RBAC permissions explanation](https://learn.microsoft.com/en-us/exchange/permissions-exo/application-rbac#why-does-my-application-still-have-access-to-mailboxes-that-arent-granted-by-the-scope-i-used-in-exchange-online-application-rbac).
### Create the application secret
1. In the app registration, open **Certificates & secrets → Client secrets → New client secret**.
2. Set a description and expiration that follows your organization's credential policy. Record the expiry and who will rotate it.
3. Choose **Add** and securely retain the secret **Value** for entry into Nobly Insight. The **Secret ID** will not work. Microsoft shows the value only when it is created; see [Add application credentials](https://learn.microsoft.com/en-us/entra/identity-platform/how-to-add-credentials#add-a-client-secret).
The current importer accepts a client secret. It does not expose certificate or federated-credential configuration. Keep the value out of screenshots, workflow variables, and support tickets.
## Create the mailbox configuration
Open your profile menu, choose **Admin settings**, then **Mailbox importer → Mailboxes**. Select **Add mailbox**. Keep **Enable scheduled import** off while configuring it.
| Field | Example | What to enter |
| ---------------------------------------------- | ------------------------------- | -------------------------------------------------------------------------------------------------------------- |
| **Name** | `Invoice intake` | A recognizable name for this configuration |
| **Mailbox address** | `intake@example.com` | The user or shared mailbox the application is allowed to read |
| **Entra tenant ID** | Your directory's GUID | Directory ID from the app registration |
| **Application (client) ID** | Your application's GUID | Client ID from the same registration |
| **Folder ID or well-known name** | `inbox` | A Graph folder ID or well-known name; a custom folder's display name is not its ID |
| **Import messages received from (local time)** | Your agreed start date and time | Earliest received instant to include; the picker displays local time |
| **Polling interval (seconds)** | `300` | Five minutes; allowed range is 60–86,400 seconds |
| **Maximum message size (bytes)** | `26214400` | 25 MiB for the entire MIME message, including attachments; allowed range is 1,024–104,857,600 bytes |
| **Document comment** | `Imported from invoice mailbox` | Optional comment passed to document creation; supply one if your destination requires it, up to 250 characters |
Existing messages in the watched folder received on or after your start time are eligible. This is not limited to unread messages or messages arriving after you enable the configuration. Take particular care when choosing a historical start date.
For your first setup, `inbox` works regardless of the mailbox's display language. For a custom folder, obtain its Graph folder ID from the person managing Microsoft 365; the importer does not offer a folder picker or recursively watch subfolders. Microsoft documents [folder IDs and well-known names](https://learn.microsoft.com/en-us/graph/api/resources/mailfolder?view=graph-rest-1.0).
After the first save, **tenant**, **mailbox**, **folder**, and **start time** are locked. Create a new configuration to change the source. The name, application ID, archive policies, mappings, interval, size limit, comment, and enabled state can be changed. [Recovery guidance](/mailbox-importer/operations#change-a-source-or-policy) explains what happens to previously imported messages.
## Choose the initial archive policy
For a first whole-message archive, set **Default archive policy → Archive format** to **Whole email (.eml)** and enter your destination **Document type ID**. The example below uses `10`.
Under **Mail keyword mappings**, open each dropdown and search by keyword name or ID. Select the keyword assigned as standalone on your destination type; the selected name and ID remain visible. Use **Do not map** for an optional parameter only if the document type allows it. For separate mail and attachment documents, or rules that choose different destinations, complete [Archive rules and keyword mappings](/mailbox-importer/archive-rules) before enabling the mailbox.
## Save the secret, then enable intake
Select **Save settings**. Saving the configuration makes its **Application secret** section available; it does not fetch mail.
With `mailbox-importer.admin`, paste the secret value into **New client secret** and choose **Save secret**. The field clears and the mailbox reports **Secret: Configured**. You cannot read the stored value back.
If you need automatic postprocessing, [configure and publish the Mail imported workflow](/mailbox-importer/workflows) before enabling intake. Scope it to the EML or HTML mail document type.
With Manage or Admin, check **Enable scheduled import** and choose **Save settings** again. The mailbox card should show **Enabled**. The checkbox is unavailable until the configuration and secret have been saved.
Send a message to the watched folder and follow the [acceptance checklist](/mailbox-importer/operations#verify-your-first-import). A successful settings save alone does not verify Microsoft 365 access or document creation.
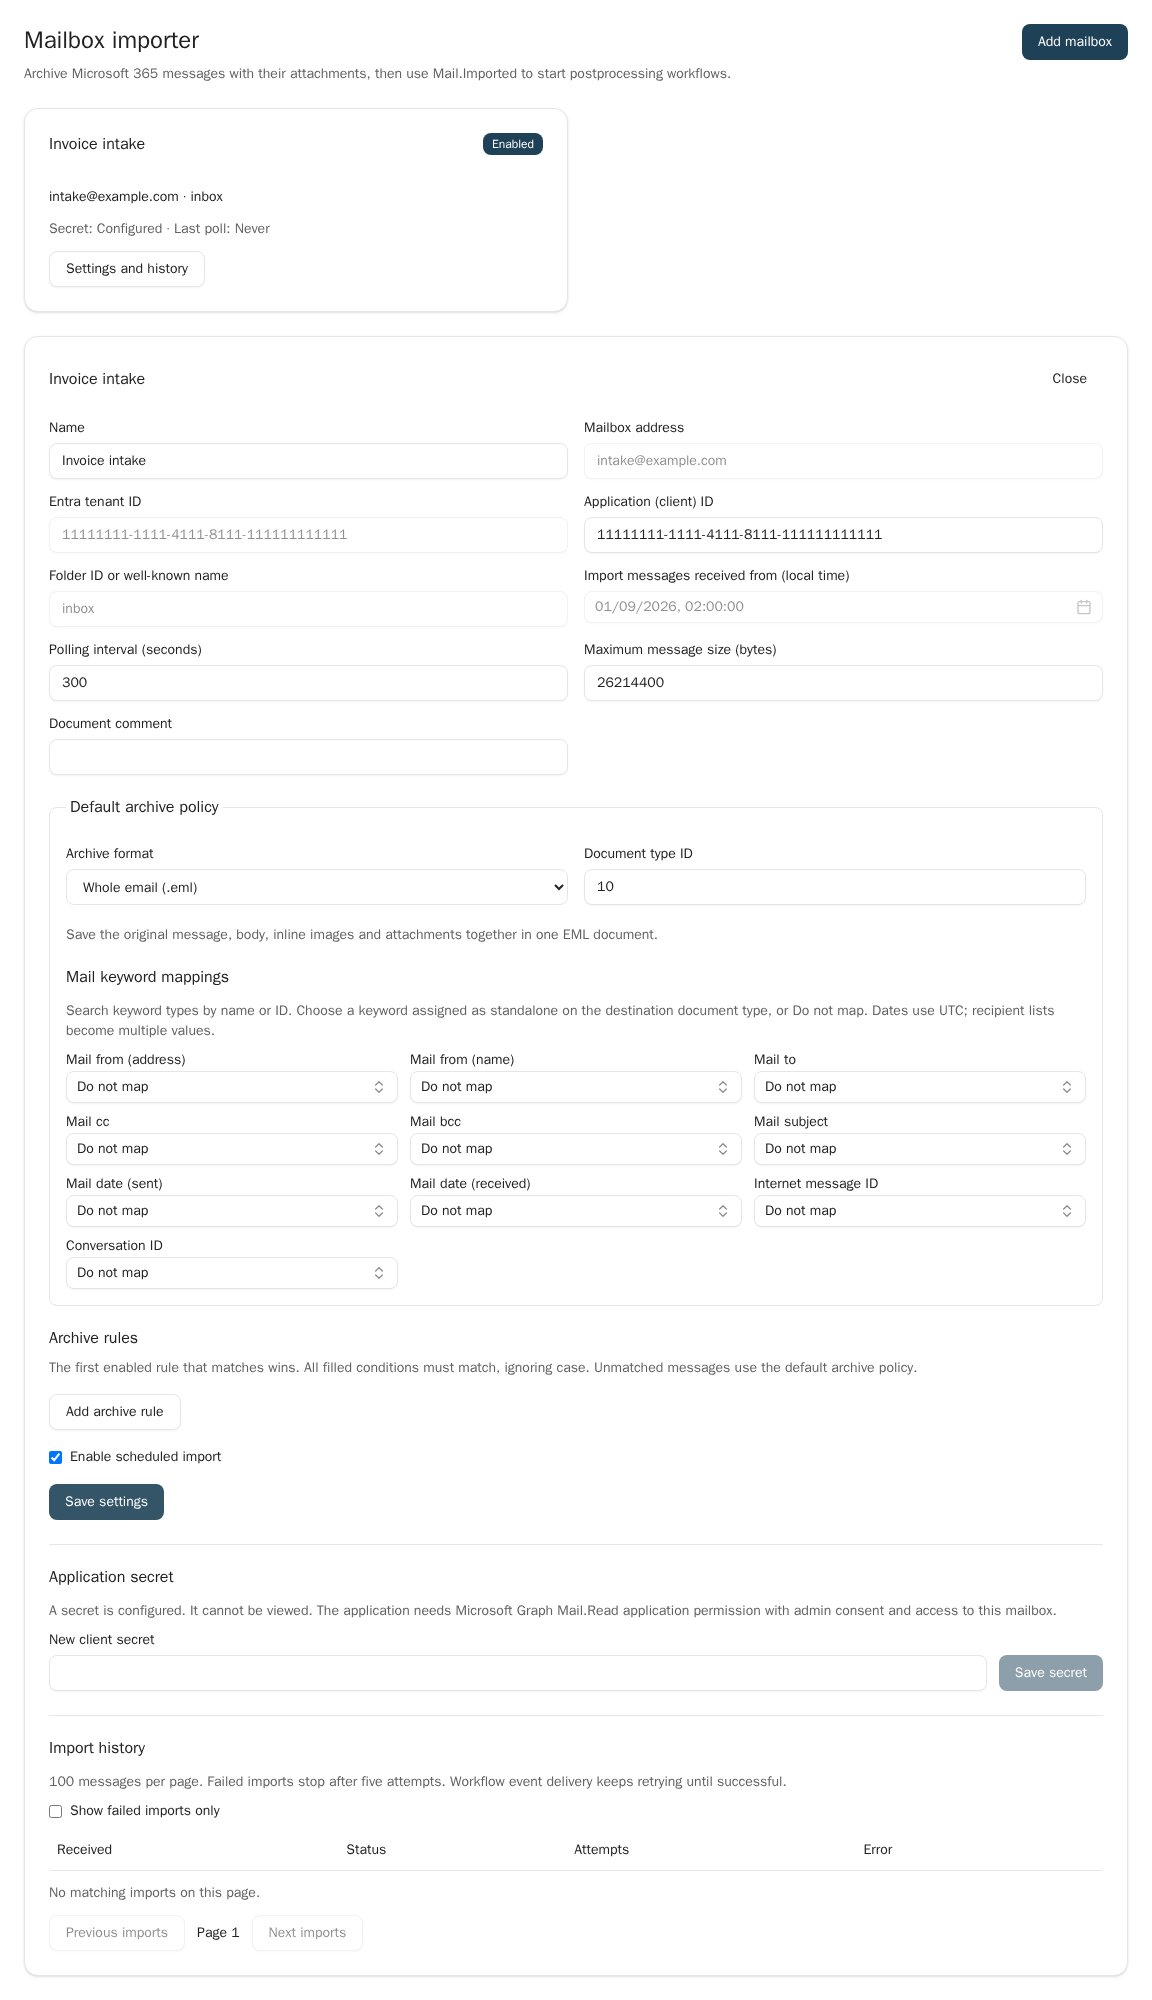 The screenshot comes from the actual Client with sample responses. **Last poll: Never** and the empty history illustrate configuration before a real mailbox has been polled. The repeated GUID is a placeholder; use the distinct tenant and application IDs from your registration.
## Where to read next
Choose EML or HTML with separate attachments, route messages by rule, and map mail metadata into each document type.
Grant View, Manage, and Admin to the groups responsible for the integration.
The screenshot comes from the actual Client with sample responses. **Last poll: Never** and the empty history illustrate configuration before a real mailbox has been polled. The repeated GUID is a placeholder; use the distinct tenant and application IDs from your registration.
## Where to read next
Choose EML or HTML with separate attachments, route messages by rule, and map mail metadata into each document type.
Grant View, Manage, and Admin to the groups responsible for the integration.